Are you looking to update the look of your kitchen without breaking the bank? A budget kitchen remodel is a great way to give your space a fresh, new look while saving money. There are plenty of money-saving ideas and DIY kitchen remodel projects that you can do to freshen up the look of your kitchen without blowing your budget. From changing out cabinet doors and drawer fronts to updating your backsplash, here are some budget kitchen remodel ideas to help you get started.
Replacing Kitchen Cabinet Doors and Drawer Fronts
One of the best budget kitchen ideas is to replace your cabinet doors and drawer fronts. This simple change can make a huge impact on the overall look and feel of your kitchen without breaking the bank.
If your cabinets are still in good condition, you don’t need to replace them entirely. Simply buying new doors can refresh the look and feel of your cabinets. Custom doors can be found online for a reasonable price. They can come painted or unpainted, depending on your preferences. Once you’ve got your new doors, paint your cabinet frames the same color to match.
How We Changed Our Kitchen Cabinet Doors
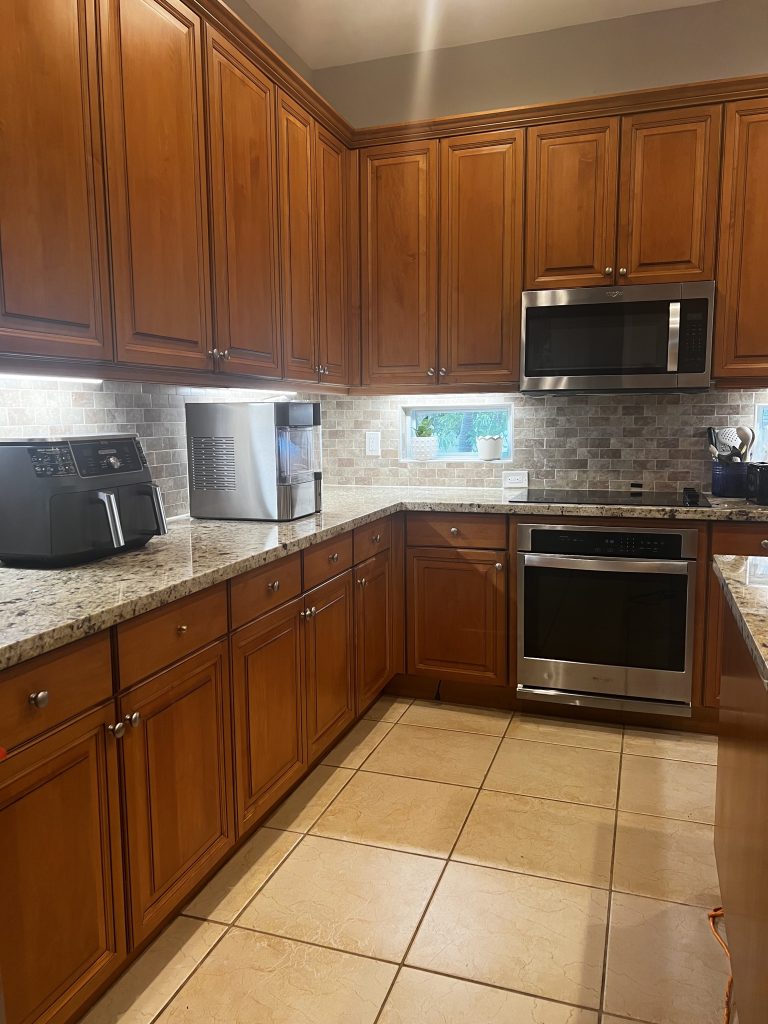
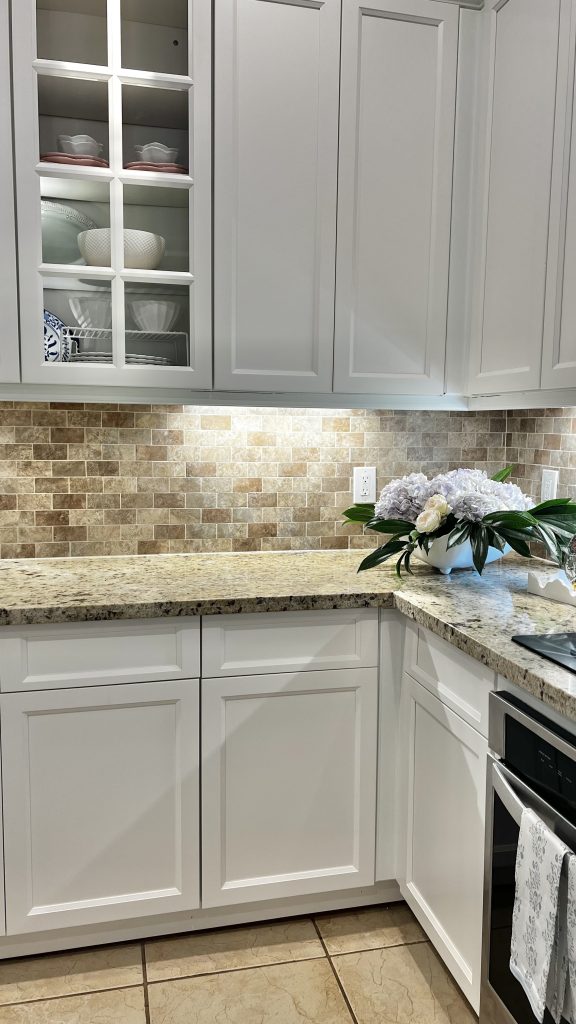
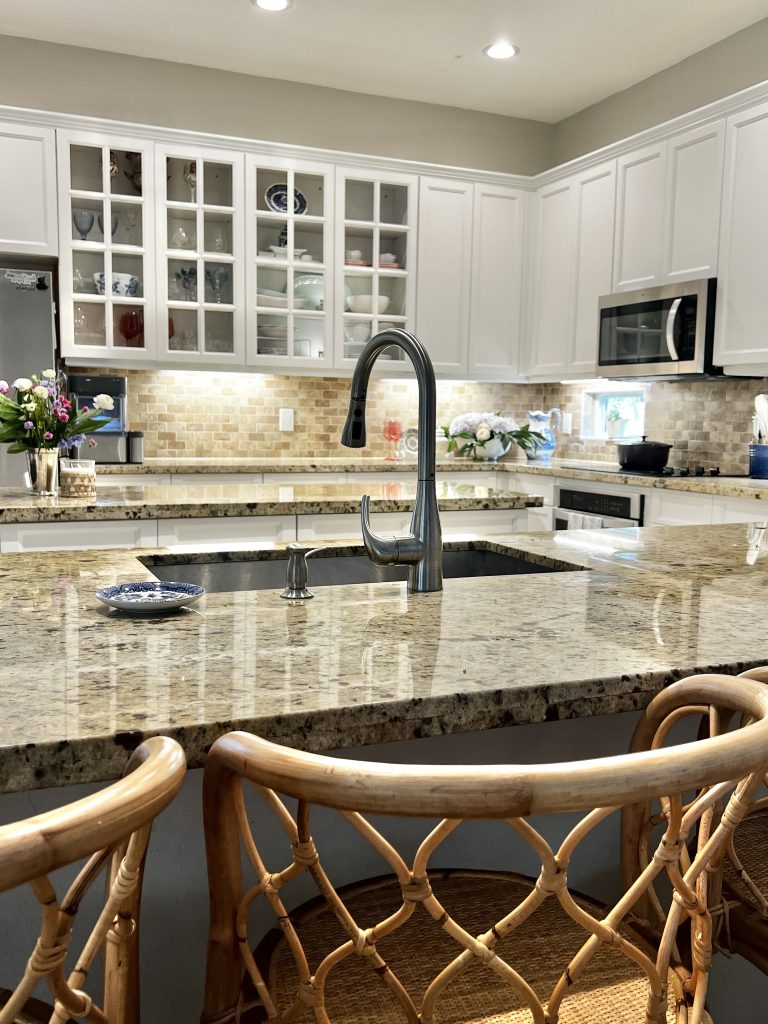
Our kitchen in our Florida house was still in good shape, but the cabinet doors were an awful orangey-brown. We found CabinetDoor.Store and their custom kitchen doors and drawers.
To order, you’ll first need to measure your doors’ length and width. If you have overlay cabinets, you’ll also need to measure the overlay. Watch here for what that entails.
But then you send your measurements to them and they produce your new doors in the design of your choice. They also have several Benjamin Moore color options to pick from if you want them painted. We chose Steam and then picked up the same color at our local store to paint the cabinet frames.
How to Prep Your Kitchen Cabinet Frames for Painting
Painting your kitchen cabinet frames can be a cost-effective way to freshen up your space, but it requires proper prep work to ensure a long-lasting finish. Here are the steps to prep your kitchen cabinet frames for painting:
Step 1: Clean the Cabinet Frames
Start by cleaning your cabinet frames thoroughly. If your cabinets are greasy, use a degreasing spray to remove the grime. If not, you can use a solution of Pinesol and water. Be sure to wipe down the frames with a clean, damp cloth to remove any residue.
Step 2: Scuff Up the Surface
Once the cabinets are clean and dry, use sandpaper to scuff up the surface of the frames. This will help the paint adhere better. Use a fine-grit sandpaper (around 220-grit) and sand lightly in the direction of the grain. Be sure to remove any dust or debris from the frames before proceeding to the next step.
Step 3: Apply a Bonding Primer
To help the paint adhere to the frames, apply a bonding primer to the surface. This will create a strong bond between the paint and the frames, ensuring a long-lasting finish. Apply the primer with a brush or roller, following the manufacturer’s instructions for drying times.

Our Benjamin Moore was closed, so we went to Sherwin Williams and they recommended this primer and paint for cabinetry.
Step 4: Paint the Frames
Once the primer is dry, it’s time to paint the frames. Use a high-quality paint designed for cabinets, and apply thin, even coats. You may need to apply several coats, depending on the color and finish you choose. Allow the paint to dry completely between coats.
Installing Your New Kitchen Cabinet Doors and Drawers
Once you have your new cabinet doors and drawers in hand, it’s time to start the installation process. It may seem intimidating at first, but with a little patience and attention to detail, it’s a manageable DIY project. Here’s how we tackled the installation of our new kitchen cabinet doors and drawers:
1. Remove the Old Doors and Drawers
Start by removing the old doors and drawers from the cabinet frames. This is usually as simple as unscrewing the hinges and pulling them off. If you’re painting your cabinet doors, be sure to label the doors and drawers so you know where each one belongs when it’s time to install the new ones.
2. Pre-Drill Holes for the New Hinges
Before you can install the new hinges, you’ll need to pre-drill holes in the cabinet frames. Measure the distance from the top and bottom of the door to the center of the hinge, then transfer those measurements to the inside of the cabinet frame. Use a drill bit that’s slightly smaller than the screw size to pre-drill the holes.
3. Install the New Hinges
Another great thing about getting new cabinet doors is that you can change our your hinges. Exposed hinges on doors is a dated look, so this is your chance to get new ones. We also opted for soft-close hinges, and I love having those so much. To install the new hinges, line them up with the pre-drilled holes and screw them in place. It’s a good idea to have someone hold the door in place while you attach the hinges to prevent it from slipping.
4. Attach the New Drawer Fronts
Attaching new drawer fronts is similar to installing new cabinet doors. Remove the old drawer fronts, then use a jig to pre-drill holes for the new hardware. Hold the new drawer front in place and attach it using screws.
5. Reinstall the Drawers
Once the new drawer fronts are in place, it’s time to reinstall the drawers. Slide them back into the cabinet frames, making sure they’re level and aligned with the other drawers.
Overall, installing new kitchen cabinet doors and drawers is a simple and cost-effective way to update your space. With a few basic tools and some patience, you can have a fresh, modern look without breaking the bank. Plus, you’ll enjoy the added convenience of soft-close hinges and a more functional kitchen layout.
Updating Cabinet Hardware
When it comes to budget kitchen ideas, updating your hardware is one of the easiest and most effective ways to breathe new life into your kitchen. This small change can make a big impact and can even transform the look and feel of your space. With new handles and pulls, you can easily give your cabinets a modern or traditional touch, depending on your personal style and preference.
Hardware is available in a wide variety of materials, such as stainless steel, brushed nickel, or even copper. These finishes can help create a cohesive look throughout your kitchen, tying in with other elements like lighting fixtures and appliances. In addition, changing out hardware is a relatively simple and quick project that can be done over a weekend.
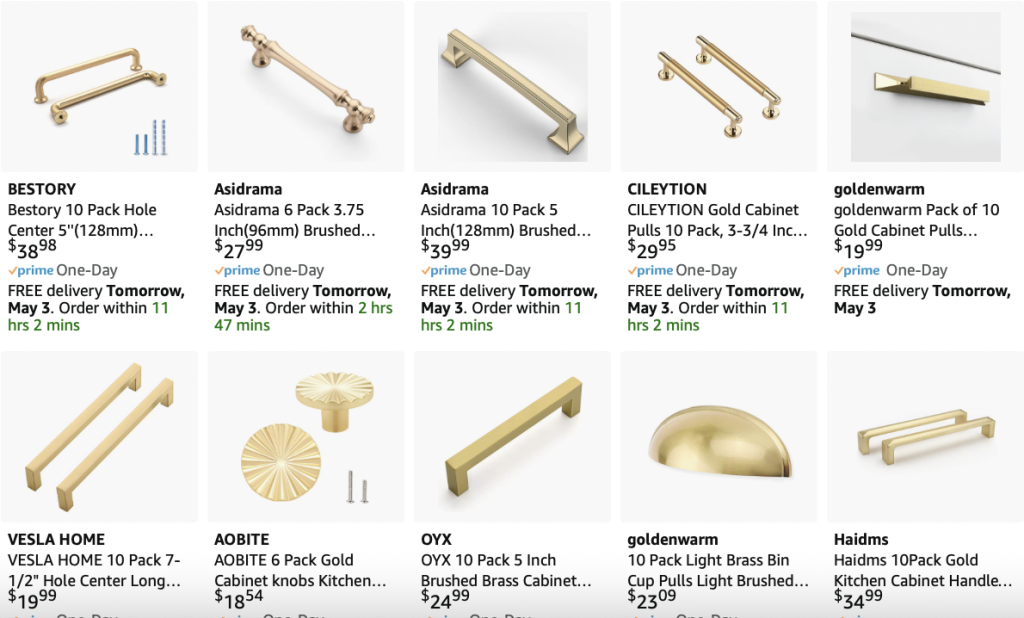
When selecting hardware, consider the style and design of your kitchen. If your cabinets are modern and sleek, go for hardware that’s streamlined and minimalist. If your cabinets are more traditional, opt for hardware with more intricate details and a timeless feel. Keep in mind that you can also mix and match hardware styles, adding visual interest and variety to your kitchen.
Updating hardware is one of the easiest and most affordable budget kitchen ideas that can help make your space feel fresh and updated. And with so many options available, you’re sure to find something that fits your taste and budget. So go ahead and take the plunge – you’ll be amazed at how much of a difference this small change can make!
Changing Your Kitchen Backsplash
A backsplash can be the focal point of a kitchen. So, if your current backsplash is dated or doesn’t suit your style, consider changing it. Changing your backsplash can completely transform your kitchen and give it a fresh, updated look. And, the good news is that you can change it without spending a lot of money.
To save money, you can do the demo of the backsplash yourself with a hammer and a chisel. Before you begin, make sure to turn off any outlets in your backsplash. If you don’t feel comfortable doing this work yourself, you can hire a professional. Once you remove the old backsplash, it’s time to pick out a new one.
A new backsplash installed in a small kitchen can cost a few hundred dollars. However, it’s important to remember that the impact of the change can truly transform the space. Choose a backsplash that complements your kitchen’s style and color scheme. You can find budget-friendly options like peel-and-stick tiles or affordable ceramic tiles. It’s important to remember that installing the backsplash yourself will also save you money.
To sum up, changing your backsplash is a cost-effective way to update your kitchen’s style. With a bit of DIY spirit and creativity, you can easily replace your old backsplash with a fresh and modern one. Remember, a new backsplash can make all the difference in your kitchen’s appearance.