How to Hang a Chandelier in Your Foyer: A Detailed Tutorial
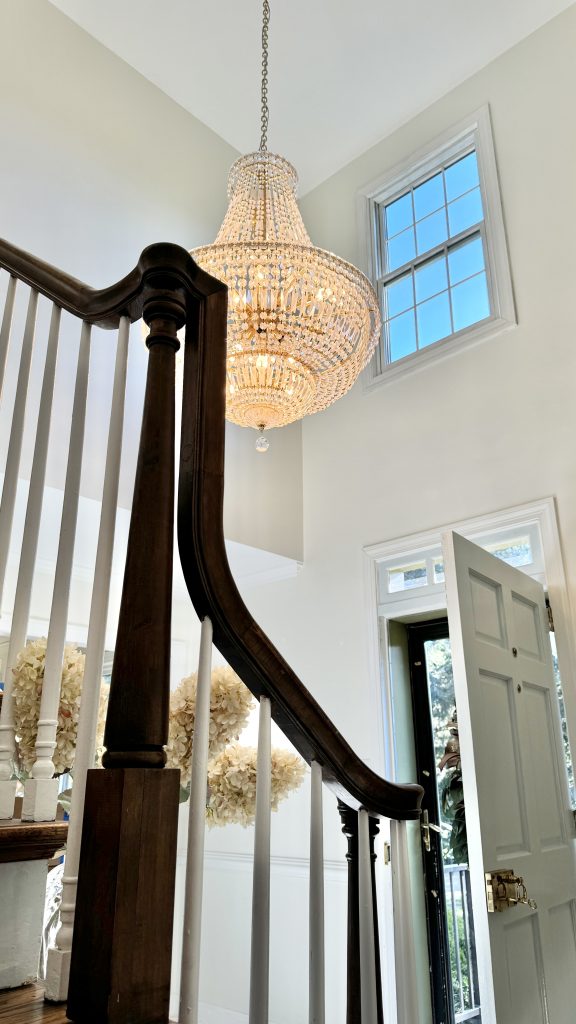
Today’s been a big day in our house. After a year of storing our crystal chandelier from FBMP, we finally are having it hung in our foyer!
Hanging a chandelier in your foyer can dramatically enhance the ambiance and style of your home. Whether it’s crystal or shaded, single or tiered, it’s sure to make a statement to your guests. However, it’s crucial to understand the process of how to hang a chandelier safely and effectively. In this tutorial, I’ll walk you through the steps we’re taking to ensure our chandelier stays right where we want it – suspended in our foyer. I’ll also share my plan for cleaning and maintaining it.

Understanding the Importance of Proper Installation
When installing a chandelier, especially in a two-story foyer, proper installation is key. While you might be tempted to tackle this task on your own, hiring a professional can save you a lot of hassle and ensure safety. Electricians typically charge more for hanging chandeliers in high-ceiling areas or stairwells, with labor costs ranging from $700 to $2,000. On the other hand, installing a chandelier on a standard ceiling could cost between $150 and $400. This investment is worthwhile for the security and precision a professional electrician brings. Understanding these costs and the importance of professional installation will prepare you for a successful project.

Step-by-Step Instructions for Installing the Motor Lift
To begin installing your chandelier, start with the motor in your attic. This is the chandelier lift motor that we purchased. This motor enables easy lowering and raising for maintenance, especially in a two-story foyer. Follow these steps:
1. **Prepare the Area:** Ensure the attic is clear and accessible. Gather the tools and motor kit specified by your chandelier’s manufacturer.
2. **Secure the Motor:** Attach the motor to the ceiling joists as per the manufacturer’s instructions. This step is crucial for supporting the chandelier’s weight.
3. **Connect the Wiring:** Carefully connect the electrical wiring according to the provided instructions. It’s advisable to hire an electrician to handle this to ensure safety and code compliance.
With the motor installed, proceed to install the switch for controlling the chandelier’s height.
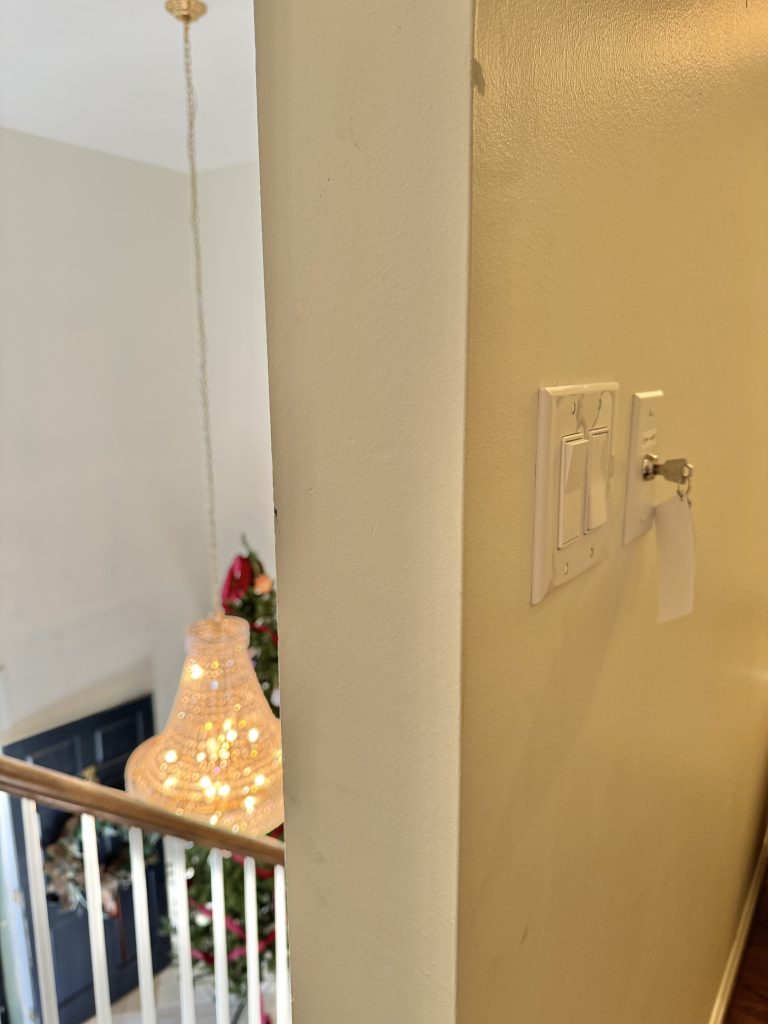
Installing the Lift Switch to Raise and Lower Your Chandelier
To install the switch for your chandelier, start by selecting an accessible and convenient location, preferably near the entryway or a commonly used wall switch. Follow these steps:
1. **Locate the Switch Placement:** Ensure the chosen spot is easily reachable and aligns with your home’s electrical plan.
2. **Connect the Switch to the Motor System:** Adhere to the manufacturer’s instructions for wiring the switch. This typically involves connecting the switch to the motor control unit installed in the attic.
3. **Secure the Wiring:** Make sure all connections are tight and comply with electrical codes. This might require the expertise of an electrician to ensure safety and proper functionality.
4. **Test the Switch Mechanism:** Before finalizing, test the switch to confirm that it raises and lowers the chandelier smoothly. Make any necessary adjustments to the connections or placement.
By meticulously following these steps, you’ll have a functional system in place that makes chandelier maintenance much easier.

Lowering the Chandelier for Cleaning
Lowering your chandelier for cleaning is a straightforward process, thanks to the motorized system installed in your attic. First, use the switch to bring the chandelier to a height that is easily accessible. This eliminates the need for ladders, making the cleaning process safer and more efficient. Ensure the area underneath the chandelier is clear of any furniture or obstacles.
Before you begin cleaning, lay a soft cloth or drop cloth on the floor beneath the chandelier. This will catch any cleaning solution drips and protect your flooring. Using a spray cleaner specifically designed for chandeliers, mist the crystals lightly. Gently wipe down each crystal with a soft, lint-free cloth, ensuring you reach all areas. Avoid using abrasive materials, as they can scratch the delicate crystal surfaces.
By following these steps, you can maintain the sparkle and elegance of your chandelier without the hassle of disassembly or climbing.
Recommended Cleaning Supplies and Techniques
To effectively clean your crystal chandelier, start by choosing a spray cleaner specifically formulated for chandeliers. This type of cleaner dissolves dirt and grime without harming the delicate crystal surfaces. Once you have your cleaner, ensure you have a soft, lint-free cloth on hand. Gently mist the crystals with the spray cleaner, avoiding any metal parts as much as possible to prevent tarnishing.

After spraying, use the cloth to gently wipe down each crystal. Take care to avoid abrasive materials, as they can scratch and dull the crystal’s surface. For more intricate designs or hard-to-reach areas, use a cotton swab lightly moistened with the cleaner. Always work from the top of the chandelier to the bottom to avoid dripping dirty cleaner onto freshly cleaned crystals.
It’s also advisable to place a drop cloth or old towel underneath the chandelier to catch any drips, protecting your flooring and making the cleanup process easier. Ensure the cleaning area is well-lit so you can see any missed spots or stubborn grime that needs extra attention.
With these supplies and techniques, you can keep your chandelier looking as dazzling as the day it was installed.
Maintenance Tips for Longevity
Keeping your chandelier in top condition involves a few simple but crucial maintenance practices. First, regularly dust the chandelier using a microfiber cloth to prevent dust buildup that can dull the shine of the crystals. In addition to dusting, make a habit of inspecting the chandelier for any loose crystals or parts. Tighten any that have become loose over time to ensure the fixture remains secure and elegant.
Another important maintenance tip is to check the electrical wiring periodically. Ensuring that all connections are secure and safe can prevent electrical issues and prolong the life of your chandelier. If you’re unsure about the condition of the wiring, it’s best to consult a professional electrician.
It’s also a good idea to keep an eye on the overall condition of the crystals and the chandelier’s frame. Over time, the frame may show signs of wear or tarnish. Using appropriate cleaning solutions and techniques, you can address these issues without causing damage to the chandelier.
Lastly, consider scheduling a more thorough cleaning session at least once a year. This involves lowering the chandelier, as detailed in earlier sections, and giving it a complete wipe-down to maintain its brilliance. By integrating these maintenance tips into your routine, your chandelier will remain a striking and functional element of your home.
Exterior Lights for Our Colonial Home
We also upgraded our exterior lights on our home today. We went with these beautiful black lanterns.